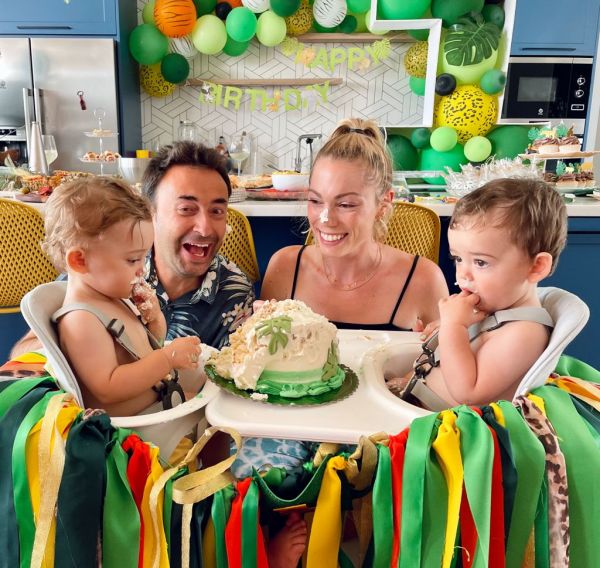
This August we celebrated Leo and Noa’s first birthday. I was excited to host a “Wild One” party for the twins—complete with safari-themed dishes, decor and of course a smash cake inspired by photos I’d seen on Pinterest. However, things like highchair garland are not easily attainable in Spain…so there were a few DIY (do it yourself) projects to get the complete look for the event. I bought all of the supplies on Amazon.es and from local shops in Sanlúcar de Barrameda.
I’m hoping my experience can help any parents out there who’d like to host a similar event while living abroad. If you’ve got any party planning tips for kids’ birthdays leave me a comment below!

DIY safari-themed balloon garland
I created the balloon garland for the party and let me tell you…I learned a lot. 🤪 To create the garland I combined both the 1st birthday jungle decoration set and Safari birthday decoration set from Amazon.es. It took me around four hours from start to finish. Here are my quick tips for DIY balloon garland:
- Balloon arches and balloon garland are not the same thing. Balloon arches are filled with helium and need to be set up the day of the event. They normally require a professional to create and cost upwards of €200. Balloon garland is much more affordable and you can set it up the night before the event. You don’t need helium for balloon garland either.
- I strongly recommend using a balloon garland strip—and especially the kind that has both big holes and little holes (to make your life easier). If you purchase a decoration kit from Amazon this strip is normally included.
- Double-sided tape is your friend. You’ll need to add smaller balloons to the ‘holes’ in your garland once it’s hung to make it appear full, and double-sided tape makes this process so much easier.
- I would definitely recommend buying a small air pump or have friends come over to help you blow up balloons.
- Don’t fill balloons up completely because the garland looks better if they have a perfectly round shape. Also, adding a variety of balloon sizes makes the garland look organic and professionally done. I found this video very helpful.
- Hanging the balloon garland on the wall can be tricky—you’ll want some command hooks and fishing line to get the job done. This video tutorial is a good example of how to do it. I got command hooks from Alcampo and fishing line from a local “Chino” or “Euro” store.
- Also, I used fake monstera plant leaves to decorate the lamps hanging over our kitchen island, tucked them into the balloon garland, and placed them throughout the food display.
I know this all sounds complicated, but now that I have created and hung balloon garland once I’d definitely do it again for parties I host in the future.
The balloon garland was the perfect backdrop for photos
DIY safari-themed highchair garland
The highchair garland is a must if you’re going for that oh-so-popular photo opp with the smash cake. My inner “crafter” came out to create this decor piece, and I was pleasantly surprised by how easy it was to assemble. The most time consuming part is cutting the fabric, but the whole process took less than 2 hours. I purchased the following supplies from local shops in town.
Supplies needed to make highchair garland:
- 3 varieties of ribbon (2 shades of green, 1 gold)
- 5 sheets of fabric: 1m x 4m long (orange, light green, dark green, yellow, animal print)
- Foam paper (I used green and gold)
- Glue gun + scissors
How to make highchair garland:
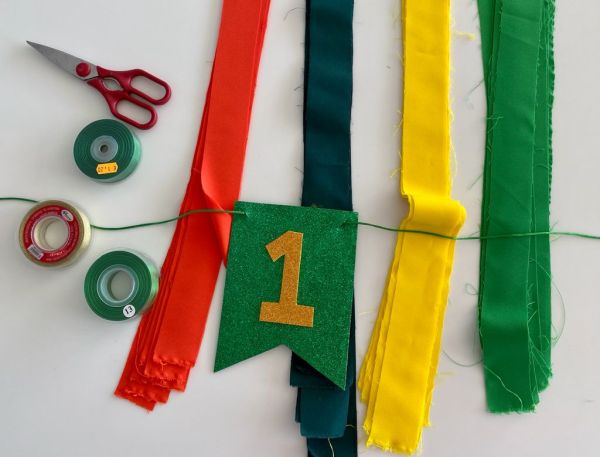
- Fastening ribbon: First I cut a piece of ribbon to the length needed to fasten it around the highchairs.
- Number 1 banner: Next, I cut out a little foam banner, glued a cut-out number “1” on top of it, cut small holes in each corner, and slipped the fastening ribbon through, so that it hung squarely in the center.
- Fabric strips: Then, I took the 5 sheets of colored fabric and cut each of them into thin strips about 1 meter long each (3 feet) and 10 cm wide.
- Assembling the garland: Last, I tied each strip to the ribbon, starting from the middle (on both sides of the banner)—I simply tied each strip into a knot so the ends would hang down on either side. Lastly, I added stips of ribbon (also 3ft each) and added them randomly throughout the fabric, to add more color variety.

Once you cut the fabric strips the garland is easy to assemble
I love how the highchair garland turned out
DIY “party animals” cake topper
It seems like those adorable cake toppers, the ones with animals in party hats, are all over Pinterest…but they’re not so easy to come by in real life, at least not here in Spain. Undeterred by the lack of inventory, I decided to make the cake toppers myself. I purchased small animal figurines from Amazon, and bought pom poms, colored wooden sticks, twine, and construction paper from a local “Chino” or “Euro” store (Chinese Bazaar).
I’m not going to lie, it took me several attempts at creating the party hats and “Wild One” banner…there are online tutorials for creating the hats but you’ll just need to try it a few times to get it right. I used a glue gun to make the cone shape of the hats, add a pom pom to each one, and attach them to each figurine’s head. I used a few of the animals on the cake and placed the rest throughout the dishes displayed on the table.
I knew the smash cake was going to be about 6 inches wide, so I created the “Wild One” banner with that in mind. I followed a process similar to the one outlined in this video, but I’d recommend writing the letters on each flag before glueing them to the twine in case you mess up. 😅

Party animal cake toppers

Creating a “Wild One” cake topper

The end result 🥳
Safari-themed food and sweets for kids’ birthday
I ordered the smash cake, cake pops, and cupcakes from a local bakery, Sweet Cupcake Chipiona. If you’re living in Rota or Sanlúcar, the owner of this bakery speaks perfect English too. As far as price range goes, the cupcakes and cake pops were €2 each, and the smash cake was €25. I also paid a €12 delivery fee.
I made an assortment of finger foods for adults and kids to enjoy. The main thing I consider when choosing party food recipes is how easy the items are to prepare. 😉 The biggest hit was the philly cheesesteak sliders (my friend hooked me up with King’s Hawaiian Rolls and Steak-umms from the U.S. Navy base). The kids loved the lion hummus dip, which can be made the night before. Caprese salad skewers are always my go-to for parties, and pineapple salsa is perfect for hot summer days (plus the pineapple bowl looks great on the display table). I also made pigs in a blanket, plus tuna salad and chicken salad bites. To serve the salad bites I simply stuffed scoops of each salad into mini tartelettes from Mercadona, and placed them on a three-tiered plate tower.

Finger food for all!

Smash cake, cupcakes and cake pops
This post contains Amazon affiliate links; any purchases made using my links will earn me a small credit to go towards baby supplies (at no extra cost for you). Learn more about my disclosure policy here.


Leave a comment